How is an irrigation system installed?
How is an irrigation system installed?
Sprinkler System Installation in 10 Steps
- Step 1: In-Ground Sprinkler Overview.
- Step 2: Dig the Trenches.
- Step 3: Make the Water Connection.
- Step 4: Install the Zone Valves.
- Step 5: Place the Pipes in the Trenches.
- Step 6: Connect the Pipe at the Valve Box.
- Step 7: Install the Pop-Up Sprinklers.
- Step 8: Roll Out the Irrigation.
Can I install an irrigation system myself?
A step-by-step process on installing your own underground system. An in-ground sprinkler system is by far the easiest and most effective way to water your lawn. You can program it to automatically water the grass on a regular schedule, which means you won’t have to drag out the hose and sprinkler every few days.
How much does it cost to have irrigation system installed?
Costs can vary from $70 to $1,000+. The cost varies from setting up less expensive manual irrigation systems for small yards to the custom design and installation of automatic irrigation systems with timers for built garden beds.
Is installing irrigation hard?
Installing an underground sprinkler is a great way to conserve water and save money on irrigation. This type of lawn irrigation system can be a complicated installation project, but with the right preparation and materials, it can be within your reach.
How deep should a pop-up sprinkler be?
The PVC pipe should be buried minimum 200mm below finished ground level to protect it. When you are ready to install your pop-up sprinklers, we recommend installing them on Articulated Risers or ‘Swing Joints’.
How do you install an automatic irrigation system?
Step by step video guide showing you how to install an automatic irrigation system. Includes trenching, connecting to main water supply, installing a system shutoff valve, cutting and connecting PVC pipe, backflow prevention, putting together a sprinkler valve manifold and connecting valve wires. Loading…
Is it safe to install an irrigation system?
Don’t rush these first two steps; an improperly installed system can result in excessive waste of water, time, and energy, not to mention the dangers of interacting with a live electric cable or causing any accidental floods.
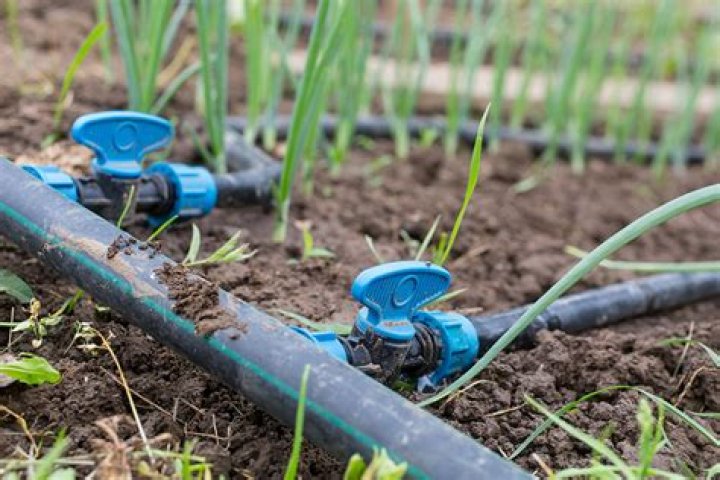
Where to place irrigation tubing in your yard?
Spread the irrigation tubing around your yard based on your layout plans. Position 1⁄2 in (1.3 cm) poly tubing along the areas that you plan to water with the irrigation system. Cut the tubing with pruning shears when you have reached the end length of your system or areas where you will need to make angles.
Do you need a sprinkler system for your yard?
So you’ve decided to install a sprinkler irrigation system to keep your lawn, yard, or other outdoor area hydrated and healthy. Good choice!
How to install an irrigation system step by step?
A Step-By-Step Guide to Installing an Irrigation System. 1 1. Careful Planing. Before you start make sure all the “t”s are crossed and “i”s dotted. While the installation of the system takes more manual labor 2 2. Map It Out. 3 3. Obtain Access to the Water Source. 4 4. Dig, Dig, Dig. 5 5. Connect the Valve Manifold.
Spread the irrigation tubing around your yard based on your layout plans. Position 1⁄2 in (1.3 cm) poly tubing along the areas that you plan to water with the irrigation system. Cut the tubing with pruning shears when you have reached the end length of your system or areas where you will need to make angles.
Why do you need an IA irrigation certification?
Whether you work in the turf and landscape, golf or agriculture sector or you design, install, audit or maintain irrigation systems, IA certification gives you a competitive edge, adds instant credibility and can help you take your career to the next level. Find out how you can become a certified irrigation professional.