How do you turn off a shower handle?
How do you turn off a shower handle?
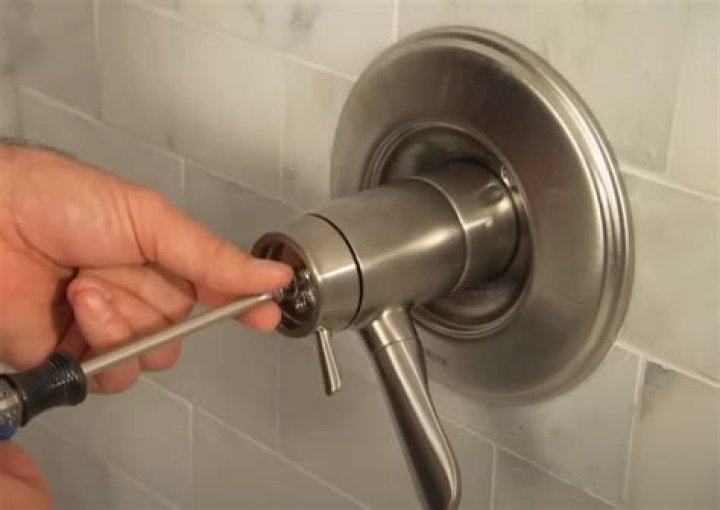
Turn off the water supply to the shower. Then pry off the handle cap with a small pocketknife to expose the internal handle screw. Loosen and remove the handle screw. Pull off the handle and set it aside. Turn off the water at the fixture shutoff valves or at your home’s main valve. Turn on a faucet to make sure it’s off.
How to fix a dripping shower faucet at home?
Identifying a cartridge-style faucet 1 Remove the handle. Turn off the water supply to the shower. 2 Remove the handle screw, then the handle. Loosen and remove the handle screw. 3 Pull the cartridge. Pull off the stop tube. 4 You may need a cartridge puller. If it’s stuck, use a special cartridge puller. 5 Install the new cartridge
Why is the handle on my shower faucet leaking?
Fixing the faucet handle. A handle that does not turn off properly may be the source of a leaking shower faucet. Make sure that the faucet handle is turned as far as it can go in the off position. If water is still leaking, the handle may be the problem.
How do you fix a dripping shower cartridge?
Turn the hex screw by hand until it bottoms out. Snug up the hex nut by hand and tug on the cartridge puller handle. If the cartridge won’t pull out, hold the puller handle steady and tighten the hex nut two full turns. Pull the cartridge out of the faucet body.
Turn off the water supply to the shower. Then pry off the handle cap with a small pocketknife to expose the internal handle screw. Loosen and remove the handle screw. Pull off the handle and set it aside. Turn off the water at the fixture shutoff valves or at your home’s main valve. Turn on a faucet to make sure it’s off.
What’s the difference between a double handle and a single handle shower faucet?
A single handle shower faucet has one handle for both hot and cold water, rather than the traditional two. These fixtures are typically found in updated, remodeled, or new bathrooms. Repairing a single handle faucet is not entirely different than repairing a double handle faucet.
Identifying a cartridge-style faucet 1 Remove the handle. Turn off the water supply to the shower. 2 Remove the handle screw, then the handle. Loosen and remove the handle screw. 3 Pull the cartridge. Pull off the stop tube. 4 You may need a cartridge puller. If it’s stuck, use a special cartridge puller. 5 Install the new cartridge
Why is my single handle shower faucet leaking?
Repairing a single handle faucet is not entirely different than repairing a double handle faucet. Typically, a leaky faucet is due to a worn out O-ring, a small rubber ring which ensures the seal between your shower cartridge and plumbing is tight.
What should I do if my shower is dripping water?
Turn off the water supply to the shower. Then pry off the handle cap with a small pocketknife to expose the internal handle screw. Loosen and remove the handle screw. Pull off the handle and set it aside. Turn off the water at the fixture shutoff valves or at your home’s main valve.
How do you fix a leaky shower handle?
#1. Fix A Leaky Faucet Handle By Changing The Faucet Valve Washer Start by turning off the water supply, just to be safe and to keep you dry! Once the knob is removed, use a straight blade to cut through the caulking connecting the handle to the wall and use your hand to pull it off. 1. Use a shower valve wrench to remove the next brass piece.
What to do when your shower Knob is stuck?
When your shower knob is stuck – really stuck – a few household remedies may help, but in the end, you may need a special tool to remove a shower handle or a tub handle. It’s called a handle puller, but before you buy or borrow one, try a couple simple strategies that may solve your problem.
How do you repair a leaking shower handle?
Remove the shower handle by either taking out the set screw on the bottom with a small slotted screwdriver or hex key or by popping off the center cap and rotating the center screw counterclockwise with a Phillips screwdriver depending on shower model. Pull the handle straight out to dislodge and remove.
How do you remove a shower handle?
1. Use a utility knife to remove the protective cap from the shower-valve handle. 2. Unscrew and remove the handle. 3. Unscrew and remove the plate from the shower wall. 4. Turn the screws on the shut-off valves to the right to stop the flow of water.
How do you replace a shower valve handle?
1. Turn off the water to the shower. 2. Remove handle and escutcheon plate to expose shower valve. 3. Loosen locking nut with pliers and pull old cartridge from center of valve. 4. Put new rubber seat with spring onto end of pencil and push into the valve. Repeat for remaining seat. 5. Insert the new cartridge into the existing valve.
How do you fix a shower faucet handle?
How to Fix a Leaky Shower Faucet Handle Step 1 – Cut off the Water Supply Step 2 – Remove the Handle Step 3 – Inspecting for Issues Step 4 – Fixing the Issue Step 5 – Replacing a Damaged Handle
What’s the best way to fix a dripping shower head?
Once the shower head is inside the vinegar, leave it for two to three hours. Turn the shower on, and all the deposits will get washed away. Scrub the shower head with an old brush to remove the remaining deposits.
Why does my showerhead drip after I Turn Off the water?
Drip or leak stops: The issue is residual water draining from the showerhead. Showerheads can experience residual water drips/leaks for up to 90 seconds after the valve is turned off. Changes in water pressure throughout the home may also cause water to drip or leak for a short period of time.
Why is water coming out of shower head when filling bathtub?
In the faucet is the diverter that divers water from the bathtub to the shower head. This happens when it is pulled down. However, if a considerably large amount of water is coming from the shower head, then there is even a greater problem. You would probably need to do repairs or replacements.