How do you remove a water saver faucet?
How do you remove a water saver faucet?
How to Remove the Water Saving Feature From a Faucet
- Block the drain so no parts fall into it. You can use a stopper or just place a small towel over the drain.
- Turn the aerator counterclockwise and unscrew it from the faucet.
- Turn the aerator over and remove the screen.
- Screw the aerator back into the faucet.
How do you remove the water saver from a delta bathroom faucet?
How to remove a flow restrictor from a Delta faucet
- Step 1: Close the water valves. Begin by turning off the water valves, found under the sink.
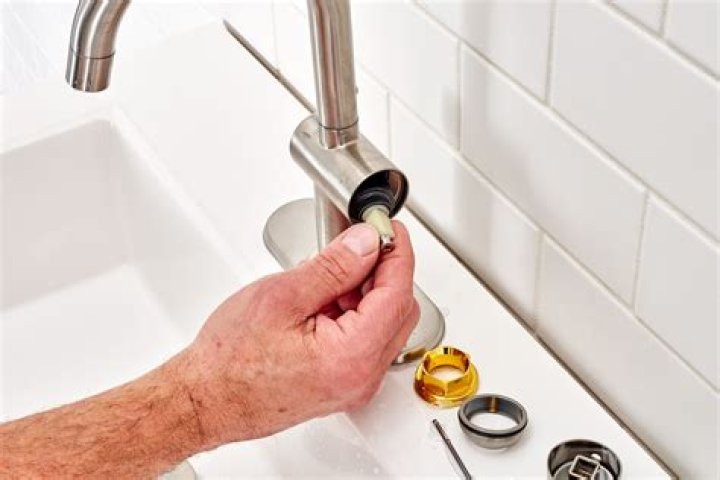
- Step 2: Open the base.
- Step 3: Protect your sink.
- Step 4: Remove the flow restrictor.
- Step 5: Check and reassemble.
How do you remove a water saver from a Delta faucet?
First, grab the aerator using slip joint pliers and loosen it counterclockwise. You can also turn it by hand, but it may be challenging for smaller or tighter restrictors. Once you’ve loosened it enough, continue to spin it by hand until it reaches the end of your faucet.
How do you remove a water restrictor from a tap?
To take off the flow restrictor, hold it with a wrench, remove necessary screws to loosen the grip, and then twist it counterclockwise.
Why do I need to remove water saver from bathroom faucet?
There are many reasons why you may be looking to increase the water flow coming from your faucet. Whether it’s a chronic problem that you’re looking to solve, or a new reduction in water flow that needs addressing; you want to know how to remove water saver from bathroom faucet to get some better water pressure and increased flow.
What’s the best way to clean a water saver?
Clean the water saver. It may be plugged by dirt and debris that has collected over time. Or it may be restricted by mineral build up – especially if the water in your area is hard or mineral-heavy. This will require something stronger than elbow grease; simply soak the water saver in vinegar overnight to dissolve the mineral deposit.
How does a water saver affect water flow?
In the same manner, the water flow to the faucet must also be adequate. Water savers typically reduce water flow by 30%; a significant reduction if the water flow is low to begin with. Low water flow might be a problem in rural areas or for those who are using a water well for water delivery.
How to remove a water restrictor from a showerhead?
Learn how to easily remove those pesky water restrictors and water savers from your showerhead! This DIY home improvement trick will increase your shower water pressure by a sizable amount. Showerhead designs vary, so be careful to not remove other internal parts from your showerhead. Tools Needed: A pair of tweezers or pliers. Loading…
How can I remove the water saving feature from my faucet?
In some cases, the restricted flow can be from a clogged aerator, but the aerator can be removed and the faucet works fine without it. Block the drain so no parts fall into it. You can use a stopper or just place a small towel over the drain. Turn the aerator counterclockwise and unscrew it from the faucet.
In the same manner, the water flow to the faucet must also be adequate. Water savers typically reduce water flow by 30%; a significant reduction if the water flow is low to begin with. Low water flow might be a problem in rural areas or for those who are using a water well for water delivery.
Clean the water saver. It may be plugged by dirt and debris that has collected over time. Or it may be restricted by mineral build up – especially if the water in your area is hard or mineral-heavy. This will require something stronger than elbow grease; simply soak the water saver in vinegar overnight to dissolve the mineral deposit.
Learn how to easily remove those pesky water restrictors and water savers from your showerhead! This DIY home improvement trick will increase your shower water pressure by a sizable amount. Showerhead designs vary, so be careful to not remove other internal parts from your showerhead. Tools Needed: A pair of tweezers or pliers. Loading…