How do you fix a leaking shower valve?
How do you fix a leaking shower valve?
How to fix a leaking shower valve in 6 simple steps: Step 1. Turn off the water supply; Step 2. Take off the shower handle by removing a screw in the middle of it. Set it aside. With some handles, the screws are hidden under a plastic cap; Step 3. Unscrew the trim plate that’s attached to the wall with two screws.
What’s the best way to remove a shower handle?
Remove your shower handle using a screwdriver. The screw will be in the center of a knob handle or on the side of a curved handle. Choose a screwdriver that fits into the screw head. Then, carefully turn the screwdriver counter-clockwise to loosen it. Pull out the screw and set it aside to reuse when you replace the shower handle.
How do you remove a single control shower?
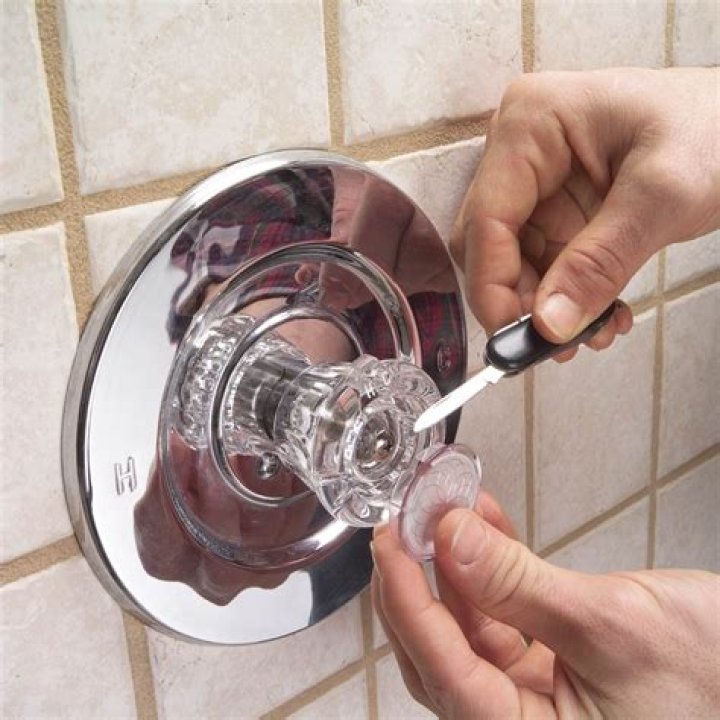
Slide the handle and bonnet off the valve. Gently pry the cover plate from the escutcheon to expose the two screws. Using a Phillips screwdriver, unthread the screw and remove the adaptor from the valve stem. Using a Phillips screwdriver, unthread the two screws and remove the escutcheon.
How do you remove trim from a shower?
Unscrew both sides and lift the trim plate from the wall. Set it and the screws aside, preferably near the shower handle, until you need to screw it back in later on. After you take the handle and trim plate off, you can soak it in vinegar or CLR to remove any built up grime.
What should I do if my shower handle is leaking?
If your shower handle has a cap over the screw in the center of the handle, pry it off with a flathead screwdriver and put it aside for later. Unscrew the handle and remove it. Next, remove the decorative faceplate behind the handle and take it off the shower wall. You may have to pry it off.
How do you remove the handle from a shower?
Remove the shower handle by either taking out the set screw on the bottom with a small slotted screwdriver or hex key or by popping off the center cap and rotating the center screw counterclockwise with a Phillips screwdriver depending on shower model.
Slide the handle and bonnet off the valve. Gently pry the cover plate from the escutcheon to expose the two screws. Using a Phillips screwdriver, unthread the screw and remove the adaptor from the valve stem. Using a Phillips screwdriver, unthread the two screws and remove the escutcheon.
What to do if your Moen shower handle falls off?
If the shower handle just fell off, removal is not necessary: you just install a new handle. Often, though, some pieces will be attached to the cartridge stem, requiring you to take them off. Remove the handle cover-plate that is hiding the handle screw.
Why is my shower mixer leaking hot water?
The reason: Most of the time, the shower mixer tap leaks because of the worn rubber seal. You can find it between the neck and the spout of the mixer, and in order to fix this leak, you should replace the damaged seal ring. Step 1. Turn off both the hot and cold water supply, and drain the water that sits in the line; Step 2.
How to tell if you have a water leak in your shower?
First, feel the water leaking from the tub spout or shower head. If it’s warm, you know that the leak is coming from the hot-water valve. If the water has been dripping for a while and it is cold, the leak is probably coming from the cold-water valve. 1 Start by removing the faucet handle.
Why does my shower head leak when I take a shower?
When water drips or drizzles from a shower head, there is a problem with the shower faucet (valve). In most cases, inner seals are worn, or parts have become corroded or clogged with hard water deposits. And the rubber O-rings and gaskets that seal connections between moving metal parts wear down with time and use.
Is there a way to stop a shower leak behind the wall?
Fixing a leaking shower valve to stop shower leaks behind the wall is a little trickier. When you turn on your tub/shower valve the hot and cold water enters the valve and mixes to the desired temperature. First, most brands of shower valves use similar methods to install the valve.
What causes a shower valve to leak behind the wall?
Most times shower valve leaks behind the wall are very slow. Usually, they are pinhole leaks from a faulty valve or sloppy soldering from the water connection points to the valve. Over the years the joint wears out or the flaw in the casting process of the valve rears its ugly head.
How do you fix leaky shower faucet with one handle?
Again, to fix a leaky shower faucet with one handle, turn off the water supply and let the faucet drain. Remove the cover cap over the handle, if there is one. Remove the handle and faceplate. Remove the locking clip over the valve, if there is one.
What happens if you have a leak in your shower?
And worse, a leak on the hot water side of the shower valve can waste significant energy because the water heater must continually operate to warm the water being drawn unnecessarily. One reader whose home was equipped with an electric water heater complained that his leaking shower valve caused his electric bill to triple.
Why is my shower faucet not turning off?
The cartridge is a device that stops the water and controls the amount of cold and/or hot water that comes out of the faucet. Over time, the cartridge wears out and needs to be replaced. So, how do you fix a shower faucet that won’t turn off all the way?
What to do if shower wont turn off all the way?
Use the screwdriver to make sure they’re as secure as possible. Turn the water back on. Simply twist your home’s main water valve into the on position to do this. Test your shower. Finally, turn your shower off and on and see if the water has stopped coming out when the faucet is in the off position.
Where is the shut off valve on a shower faucet?
When working on shower faucets, place rags in the tub or shower floor beneath the faucets and over the drain to protect the surfaces and prevent small parts from being dropped down the drain. Before opening up a shower valve, turn off the water supply. In some houses, a shut-off valve is located in the bathroom, near the shower, or in the basement.
How to Repair a Leaky Single Valve Shower Faucet Step 1 – Turn off Water Supply Step 2 – Screw Removal Step 3 – Taking the Escutcheon Away Step 4 – Remove the Valve Cartridge Step 5 – Replace O-Ring Seal or Gasket Step 6 – Ensure the Water Integrity on Valves Step 7 – Finishing Touches on Your Repairs
How do you fix a leaking valve?
Leaky heart valve surgery is the only way to fix a leaking heart valve. This typically involves undergoing open heart surgery, where a surgeon cuts open the sternum to repair or replace the regurgitating valve and its structures.
Where are the shut off valves for the shower?
The shower water shut-off valve is located on a pipe that leads to your bathroom, which can be found in the basement, behind an access panel on the wall near the bathroom, or in a utility closet. Turn the shut-off valve handle clockwise to close it.
How do you shut off shower water?
Instructions Step 1: Turn off water Turn off the water to the bathtub and shower at the shut-off valve. Let any remaining water flow out of the faucet. Step 2: Remove the cap and screw Remove the cap and screw from the faucet handle using a screwdriver, and take off the handle and escutcheon.