Can a spout be removed from a slip on bathtub?
Can a spout be removed from a slip on bathtub?
You can remove your tub spout by twisting it counter-clockwise to see how your existing spout is threaded, if desired, but it is recommended you leave the spout on if you might need to use the tub before your new spout arrives. A slip-on style bathtub spout will have a setscrew, which is a small screw located on the bottom of the tub spout.
Why is my bathtub spout not working properly?
Most come with a bushing so they fit either 1/2-in. or 3/4-in. pipe. These are the three most common types of spouts. Plumbers tell us that leg-shaving is the leading cause of tub spout trouble. The spout makes a convenient footrest for shaving, but that can damage the tub spout diverter or loosen pipe connections.
How can I tell what kind of tub spout I have?
Within those two types are different attachment options: slip-on with setscrew or the threaded type. Grab a flashlight and look beneath the tub spout while it still attached to the wall. If you can see a tiny screw on the underside of the spout, you have a slip-on tub spout with a set screw. If there is no set screw, you have a threaded tub spout.
What kind of adapter do I need for a tub spout?
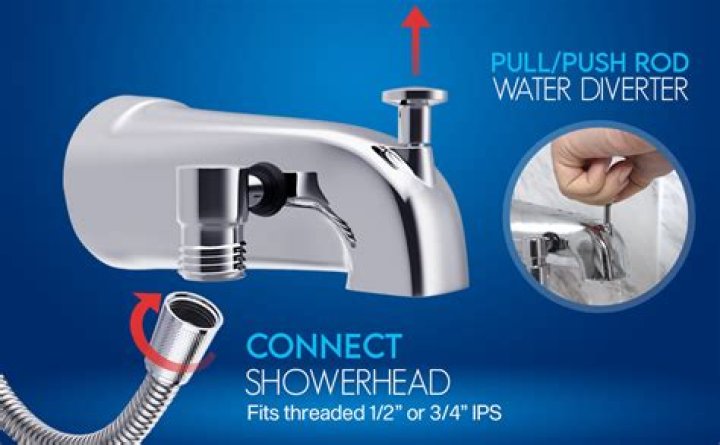
There are two types of brass adapters, either a 1/2″ IPS (iron pipe size) threaded adapter or a 1/2″ nominal inside diameter ( CTS) slip-on adapter, depending on the type of tub spout originally purchased.
You can remove your tub spout by twisting it counter-clockwise to see how your existing spout is threaded, if desired, but it is recommended you leave the spout on if you might need to use the tub before your new spout arrives. A slip-on style bathtub spout will have a setscrew, which is a small screw located on the bottom of the tub spout.
Most come with a bushing so they fit either 1/2-in. or 3/4-in. pipe. These are the three most common types of spouts. Plumbers tell us that leg-shaving is the leading cause of tub spout trouble. The spout makes a convenient footrest for shaving, but that can damage the tub spout diverter or loosen pipe connections.
How do you install a new tub spout?
Measure your old tub spout and make sure your new spout is the same length as your old one. My is 5 ¼ inches in length. Clean debris and old Teflon tape off the end of threaded pipe. Clockwise, wrap two layers of Teflon tape around the end of the threaded pipe. Now, screw the new tub spout on clockwise by hands until it’s tight and pointed down.
What’s the best way to replace a bathtub faucet?
Pull the spout from the wall with both hands. When removing a threaded spout, place the jaws of locking pliers or a pipe wrench around the spout and tighten until secure. Turn the wrench counterclockwise until the spout is free.
What should my intention be when installing a tub spout?
Remember, with a tub spout your intention should be to achieve a clean, well positioned installation. Forget water leaks. They won’t happen. Tub spout tips: Although there are only two kinds of tub spout types (threaded and slip) there are several “sizes” (lengths) in each group. This is where your patience is important.
Where do the threads start on a threaded tub spout?
The threads on a threaded spout begin at a certain distance from the very back edge of the spout. Measure the distance in your old spout and then the distance in the new one. If they exactly compare you have a spout match and an easy installation that should be seamless. Spout diameter is rarely ever a problem.
How do you remove the spout from a bathtub?
If you see a tiny screw on the underside of the spout, then you have a slip-on tub spout with a set screw. If there is no set screw, like mine, you have a threaded tub spout. You can remove your tub spout by twisting it counter-clockwise.
Why do I need to replace my tub spout?
Replacing a tub spout is a straightforward project whose necessity arrives sooner or later in the life of most bathrooms. A tub spout does two things: It provides a decorative cover for the pipe stub delivering water to the bathtub, and it directs the water away from the wall where it could cause damage.
Can a telescoping spout be attached to a bathtub?
A telescoping spout is also a type of threaded bathtub spout which provides flexibility for many installation applications by allowing an adjustment, usually up to 1″, to be made for the finished wall. The telescoping spout attaches to either a 1/2″ or 3/4″ nipple with a Celcon bushing. Tub Spouts with Brass Adapters – Threaded or Slip-on
How to install a tub spout with brass adapter?
1 Install a 1/2″ iron pipe sized nipple so the end of the nipple projects out from the finished wall surface between 1/2″ and 1-1/4″ 2 Apply thread sealant PTFE tape or pipe compound to the pipe nipple threads. 3 Hand tighten adapter onto pipe nipple. 4 Thread the tub spout onto the brass adapter hand tight.
How do you get a faucet out of a tub?
Once you’ve done securing the faucet, you’ll get a firm grip to hold the faucet correctly with the wrench. Now, attach the wrench with the faucet and turn them both. This time do it counterclockwise. The process will separate the connection from the water pipe, and your faucet will come out.
How do you change a bathtub spout?
Removing and Replacing Tub Spout Determine the tub spout’s type before you replace the bathtub faucet single handle. Use the pipe wrench for spouts that screw on. Locate the setscrew on the bottom of the spout for a tub spout so equipped. Replace a setscrew tub spout by holding the spout in place and screwing in the setscrew underneath the spout.
How do you remove the bathtub faucet?
Remove Faucet Handles Turn the shut-off valve on the water line for the shower and tub to turn off the water. Place the tip of a screwdriver beneath the edge of the decorative cap on a handle to pry it off. Turn screws in the center of the faucet handles counterclockwise to remove them, and pull the handles off.
Why does your tub faucet leak when the shower is on?
However, if a large amount of water is coming out of the tub faucet and very little is coming from your shower head, it is likely a problem with that valve. In some cases, the only way to know the root of the problem is to take apart the assembly and check all of the valve parts individually for damage.